Last updated on May 22nd, 2021 at 06:34 am
If you are a blogger or a site owner then Google Search Console is a productive tool that you need to learn about. It helps in providing search related metrics, site performance measures, visibility in search results, etc. All these factors are important for making SEO friendly content. Let’s know more about what is Google Search Console, how to set up Google Console, and how to use it.
Table of Contents
WHAT IS GOOGLE SEARCH CONSOLE?
According to Wikipedia, the meaning of Google Search Console is
Google Search Console is a web service by Google which allows webmasters to check indexing status and optimize visibility of their websites. Until May 20, 2015, the service was called Google Webmaster Tools. In January 2018, Google introduced a new version of the search console, with changes to the user interface.

HOW TO SET UP GOOGLE SEARCH CONSOLE
The setup of the Google search console is an easy process. I will tell you How I activated my Google Search Console in this article. It involves:
- Add a Google Account to Google Search Console
- Add your website in the Add property section
- Verify the property through any of the given 5 ways
- Once verified you have completed the setup process for your website’s console-setup.
Let’s see how it works.
STEP 1: SETUP A GOOGLE ACCOUNT FOR THE CONSOLE
First of all, click on the Start now button on the search console About page.
Then either make a new Google account or if you already have one, just log in with that.

Also Read: How to become a content creator
STEP 2: ADD A PROPERTY TO GOOGLE SEARCH CONSOLE
After successful login, you will have a window i.e. displayed below.

You have to add your site’s domain address into one of the option appearing in the search console.
If you have previously gone through that process, click the Already started? finish verification. to reach to the final verification panel.
STEP 3: VERIFY THE PROPERTY BY ANY OF THE FIVE METHODS
When you enter the URL e.g. https://yoursiteurl.com into the Enter URL box, a window will popup i.e. Verify Ownership.
The console provides 5 suitable ways to verify your site’s URL:
- HTML file
- HTML tag
- Google Analytics
- Google Tag Manager
- Domain Name Provider
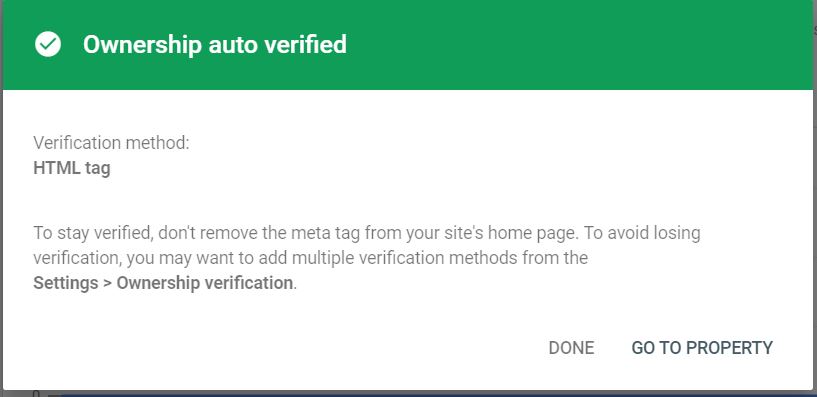
I chose the HTML tag for my site verification.

It generates an HTML tag. You have to put that meta tag into the site verification column of your website.
Once you complete that step and click on Done, it will verify the code on your site and popup as Ownership Verified.
If it is showing Google Search Console verification failed, then you have to recheck your site property if you have properly placed the HTML code or the HTML meta tag into it.
Once you modify the tag properly, you can re-verify your property.
STEP 4: CONGRATULATIONS
When you click on GO TO PROPERTY button, you will see the first look of your site’s console. This shows that the search console set up is successful.
You will find everything empty as shown in the below figure.
Don’t get worried about anything.
Google Crawlers take one or two days to successfully crawl your site and start displaying the results in different sections of the console.
If you are figuring out how to find actual visitors on your social media account, read How to find Fake Accounts on Social Media.
FEATURES OF GOOGLE SEARCH CONSOLE
Google Search Console or Google Webmaster tools is very easy to use. It is free of cost and has lots of special features eg:
1. Helps in Content Optimization
You can easily find targeted keywords and queries that are bringing traffic to your website.
Check daily impressions, clicks on the links, SEO compatibility, and the position in the Google search.
2. Sitemap Submission
Submit your sitemap through the search console. This keeps the crawlers up-to-date with your content.
Submit your URLs and make sure Google search console has crawled the latest version of your URL or the whole website.
3. URL Inspection
You can find the detailed crawls, index, and information about the pages from the Google index.
This also tells about the specific problems in particular URLs like broken, missing, canonical, etc.
4. Helps in overall Site Optimization
Google search console also provides details about the performance of your site on various devices eg. desktop and mobile devices. I will explain it in detail later in the blog.
5. Helps in Detailed Report Generation
Google Search Console reports are very important from an SEO perspective. They are free to generate at a single place and are also trustworthy.
If you are new to blogging, learn How to set up your blog easily, and start your blogging journey.
I have enlisted all the properties of Google Search Console and give a brief about them.

MENU OF GOOGLE SEARCH CONSOLE
This menu appears on the left side of the window.

The three main buttons are Overview, Performance, and URL Inspection.
Additionally, it has four different sections. I am listing the whole menu bar with what it contains.
1. INDEX
- Coverage
- Sitemaps
- Removals
2. ENHANCEMENTS
- Core Web Vitals
- Mobile Usability
- AMP
3. SECURITY AND MANUAL ACTIONS
- Manual Actions
- Security Issues
4. LEGACY TOOLS AND REPORTS
- International Targeting
- Crawl Stats
- Messages
- URL Parameters
- Web Tools
After going through the above setup, you are ready to explore the Google Search Console on your own. You will then easily find the changes in your website hits due to various Google algorithm updates from time to time.
If you like my content and want to get it personally in your e-mail, please drop your email. You will get updates in your email.
Please share your valuable reviews into the comments.
Please Subscribe to my newsletter for getting more such updates.
6 thoughts on “Google Search Console beginner’s guide for 2020”